Dfwi
-
Posts
49 -
Joined
-
Last visited
-
Days Won
2
7 Followers


Recent Profile Visitors
2,934 profile views
Dfwi's Achievements
")
Newbie (1/14)
50
Reputation
-

Harvesting, Drying & Curing Step by Step
Dfwi replied to lamsbread's topic in Grow Guru - Advanced Techniques
Drying i lay a tarp down & lay a flywire screen down above it raised up of the tarp a book or brick on each corner will work, turning buds each day. ounce they are dry all the broken hairs have fallen threw the screen and will be on the tarp, theses now can be put into a mort and pestal and turned into some of the best hash you will ever get. Use a stone mort and pestal i sit it on the stove on a low heat and add the broken tricloms and water slowly all the time pounding the tricloms the water helps break the tricloms down and the heat will evaporate the more you work it the finer the hash becomes. As far as cure goes its like a fine wine the longer the better. Keep everything stems shades everything bag it up and freeze it then its ready for buddle hash no need to waste anything. -
Been smoking for over 40 years to many to mention but Nepalese Temple Balls are very high on the list
-
Hello fellow hunters I’m doing this post as I have had many ask what to do at different stages of an indoor hydro grow. I have been growing indoor since I was 13yr under the house with dad’s aquarium lights. It was a combination of seeing the plants in the aquarium growing and mums terrarium with a fern in it under a light hanging in the hallway that got me thinking. Why not apply those principles to growing pot. So I hit the library but all I could find was the ancient methods used by the Aztec’s and Egyptians. Coming from a well to do family I couldn’t grow outdoor as our gardener was old Mr Straight who had already found one outdoor plant I had and ran to mum and dad, so I had to go stealth and I ended up under the house. There were no hydro shops when I started and there were many failed homemade systems and toxic nutrient mixes and much trial and error. After all this trial and error over the years the one thing that I’ve learnt is KEEP IT SIMPLE end of the day it’s just a weed. In this post I will show the systems, nutrients and some room details that I use now days. A few grows I have done I’ve kept a day to day diary of what has been done. I’m sorry I don’t have any pictures of my personal grows as they were all lost with an old PC. THE PLANT I’m all about yields; I don’t see the point in paying for power and all the other associated costs with indoor growing to have small yields but each to their own. The GH strain I love to grow and have gown for almost 4yrs non-stop is the Greenhouse Cheese. I like the phenomenon which has a few sativa traits in it. I believe a 70% indica 30% sativa is a good mix. On average I get 250grams plus per plant. THE ROOM & SYSTEM FOR MY CLONES I grow from clones in a basic flood and drain system in 2 x 2mtr square tent. The trays are 2mtrs square and holds 60 to 80 clones in 40mm x 40mm Rockwool cubes placed into small netted pots filled with clay balls. Once the netted pots are laid out I fill the tray with clay balls this allows you to feed less as the root systems are not exposed and the clay balls keep in some moisture. The main reservoir has a fish tank heater set at 16c and has 2 air stones running 24/7. I flood the tray for 15mins every 3hrs. As for lighting I use 4 x 25watt 2700k CFL’s as I’m happy with them growing slow. I take the clones from my mother plants 6 weeks before the current grow finishes. By the time the current grow has ended the clones are all around 300mm to 400mm and have established a strong root system. THE ROOM & SYSTEM FOR FLOWER The flower rooms are 6mtrs square which are painted floor to ceiling in satin white. I use a very simple pot in pot system. The top pots are 15ltr round pots filled with clay balls with a feeding ring at the top, they are sitting on top off 25ltr buckets which are raised up on milk crates to allow the nutrient to gravity drain back to the main reservoir. The main reservoirs are custom made 316 stainless steel that holds about 200ltrs. The reservoir has a fish tank heater set at 16c and 5 air stones running 24/7. The room holds 36 plants which gives each plant 1mtr square. As for lights I use 12 x 600watt HPS. I use 8 pedestal fans placed around the room set at different height’s to create good air flow, 2 large inline extraction fans and 4 smaller inline fans blowing fresh air in. I believe you can’t have too much air flow. The plants are feed for 15mins every 2hrs. The clones still in their smaller netted pots go straight into the 15ltr top pots. I don’t like to pull the clones from their smaller pots don’t think there is any need and it minimises any transplant shock. NUTRIENT & OTHER NEEDS http://hydrocentre.com.au/nutrientchart/ The nutrient I use is only available in my country. It is something my good friend who owns a hydro shop, myself and a good friend who is a horticultural chemist with the CSIRO developed over a 2year period. It is a three stage nutrient STAGE 1 GROW, STAGE 2 FLOWER, STAGE 3 FRUIT. I also use the Vitamins at all stages and the Organic booster during Stage 3 Fruit. Before using this nutrient I used Canna products, before that there were no hydro shops and I had to make my own from organic fertilizers I could get at the nursery. When it comes to nutrient one thing I have learnt is whatever brand you choose just stick to that brand as they are designed to work and complement each other. Mixing nutrient brands can often course problems. As I’ve said a very good friend is CSIRO chemist and has tested different brands and mixes over the years and some results have been shocking. Quite often the ingredients shown on a label will not list the full makeup of the product and we are yet to find one that does. Certain chemicals when mixed can cancel out others sometimes even creating toxic mixes. The only time I would use a different brand would be for PK boosters in the flower stages and lower my main nutrients EC to compensate. I have also been known in the last few weeks to add different fruit juices for taste, pineapple, and mango. I use Canna clay balls and have had some for over 10yrs, as long as you give them a really good wash after each grow they can last a life time. I use Bluelabs truncheon pen and PPM & EC meters and their PH meters, I have used cheap e-bay pens and other so called top brands over the years and by far found Bluelab products to be the most accurate and robust, you pay for what you get. THE GROW DAY BY DAY This is a day by day grow I will just copy and past straight from my iCal. I keep the clones for 14 to 18 days on veg cycle under the stronger HPS. This helps the plants get ust to the stronger light spectrum and establish a good root system. And this grow I tried some Monsta Bud. You will notice I check things almost every day making changes as needed. Two simple rules I follow is right PH and fresh nutrient many will say I waste nutrients but I have found over many years fresh is best. This is an old grow from 2009 we hadn't developed the PK boosta yet so im using Monsta bud 15th start new Cheese grow clones gone in on veg 18/6 start 6pm ppm 1200 ph 5.4 19th veg water change flush with fresh water Veg nutrient ppm 1400 ph 5.4 22nd end of week 1 23rd veg water change flush with fresh water Veg nutrient ppm 1400 ph 5.4 27th veg water change flush with fresh water Veg nutrient ppm 1400 ph 5.4 29th end of week 2 1st plants go into 12/12 flower cycle after 16 days veg under HPS's 2nd water change to stage 1 flower flush with fresh water nutrient ppm 1200 ph 5.7 7th water change Flush with fresh water Nutrient ppm up to 1500 ph 5.8 8th end week 1 flower 10th water change Flush with fresh water Nutrient ppm up to 1500 ph 5.8 12th water change and fresh water flush Nutrient ppm 1600 ph 5.9 15th water change and fresh water flush Nutrient ppm 1600 ph 5.9 end week 2 flower 18th water change and fresh water flush Nutrient ppm 1600 ph 5.9 21st water change and fresh water flush Nutrient ppm 1600 ph 5.9 22nd end week 3 flower 23rd water change and fresh water flush Nutrient ppm 1600 ph 5.9 26th water change and fresh water flush Nutrient ppm 1600 ph 5.9 27th added 20ltr fresh water no nutrient ph 6 having to just top up with fresh water till lights come on at 5pm 28th just topped up with fresh water again ready to start stage two of flower and introduce more PK's 29th Flushed with fresh water. Changed Nutrient to Stage 2 flower ppm 1600 ph 6 Started adding PK mix monster bud 50ml will increase over next week or so and reduce base nutrient A & B till we are just running only monsta bud only. End week 4 flower 30th having to just top up with fresh water till lights come on at 5pm added 20ltr fresh water ph 6.1 31st Flushed with fresh water. Water change ppm 1700 ph 6.1 150ml part A & B stage 2 flower and 100ml Monster bud 1st flushed with fresh water. Water change ppm 1800 ph 6.1 150ml part A & B stage 2 flower and 150ml Monster bud 2nd Green House Cheese don't seem to like ppm above 2000 am getting slight nutrient burn on tips of leaves if ppm's gets above 2000ppm. Keep ppm at 1500 to 1800 and they seem to be very happy 3rd flushed with fresh ph 6 water. Water change ppm 1700 ph 6.1 150ml part A & B stage 2 flower and 150ml Monsta Bud 4th added 20ltr fresh water ph 6 5th flushed with fresh ph 6 water. Water change ppm 1700 ph 6.1 100ml part A & B stage 2 flower and 200ml Monsta Bud end week 5 flower 6th added 20ltr fresh water ph 6 7th added 20ltr fresh water ph 6 8th flushed with fresh ph 6 water. Water change ppm 1700 ph 6.1 80ml part A & B stage 2 flower and 250ml Monsta Bud 9th flushed with fresh water. Changed nutrient ppm 1600 ph 6.1 Added 700ml Monsta Bud only Cut out Stage 2 flower nutrient and will start to load them up on Monster Bud only PPM 1600 to 1800. Till the 23rd or 24th have a feeling they will go over buy few days and then flush with PH 6 to 6.1 till finish 10th Checked nutrient at 2am ppm had raised to 2200 so added 20ltr fresh water and adjusted ph to 6.1 at 6pm flushed with fresh ph 6 water. Changed nutrient ppm 1600 ph 6.1 Added 700ml Monsta Bud only 11th adjusted PH back down to ph 6.1 rose to 6.7over night 12th Flushed with fresh water Change water ph 6 ppm 1700 700ml Monsta Bud only end week 6 flower. Gave plants a hair cut stripped all the shade leafs off. 13th ppm is raising from 1700ppm to 2200ppm in 12 to 16 hrs also Ph is raising to 6.7 needing to add fresh water to drop ppm back down to 1600ppm and lower ph back to 6 14th Flushed with fresh water Change water ph 6 ppm 1700 700ml Monsta Bud only 15th lowered Ph down to 6.1 got up to 6.5. PPM's seem to have leveled out no more raises. They always seem to play up when you switch to all PK's for a few days????? 16th Flushed with fresh water Change water ph 6 ppm 1700 700ml Monsta Bud only 17th Adjusted Ph down to 6.2 got up to 6.4 18th Flushed with fresh water Change water ph 6 ppm 1700 700ml Monsta Bud only 19th They look to me as though they need a few extra days so will keep them on Monsta Bud till 23rd or 24th then will flush with fresh water till finish end week 7 flower 20th Added 40ltrs fresh water and added 100ml Monsta Bud ppm 1700 Ph 6.2 21st Added 20ltrs fresh water ppm 1600 ph 6.2 22nd Flushed with fresh water Change water ph 6 ppm 1700 700ml Monsta Bud only 24th Flushed with fresh water and will now just keep topping up with fresh water no nutrient till finish. By the looks of things they are going to go over by 4 or 5 days. 25th topped up with 10ltrs fresh water ph 6.3 26th Cheese finished end week 8 flower according to GHS 27th flushed with fresh water and add last of monsta bud ppm 1400 ph 6.3. Also turned lights down to 11 on 13 off. will decrease by another 1hr on 30th 28th Added 10ltrs fresh water only ppm 1400 ph 6.3 29th Added 20ltrs fresh water only ppm 1200 Ph 6.3 30th Switched lights down to 10hrs on 14hrs off Added 15ltrs fresh water only ppm 1100 ph 6.3 31st added fresh water only ph 6.3 1st added fresh water only ph 6.3 2nd added fresh water only ph 6.3 end week 9 flower 4th cheese finished 9 weeks 3 days flower time
- 1 reply
-
- 2
-

-
-
-
i believe grew the GH cheese for almost 4 yrs good things come to those who wait
-
Cannabissapean is right onto it forgot about the aqurium. You could also mix in some clay balls instead of the perlite and as Cannabissapean said even when adding organic ferts take it slow better to under fert than over fert
-
-
-
great post for all you smaller scale guys a great subsatute to the cement mixer is a camping washing machine which you can get at any good camping store for under $40. Buy using the mixer or washing machine will eliminate the chance of damaging your bags.
-
Growers have long added nutrients to their gardens by soaking manure or compost in containers of water and pouring the resultant brew on their plants. But according to soil microbiology expert Dr Elaine Ingham, this traditional method of making “compost tea” can produce mixed results, particularly in terms of the vital microbial life the liquid contains. My first introduction to the horrors of what can happen when manures are allowed to ferment. A large number of the organisms in the ferment were human disease-causing organisms, or pathogens. Animal manures contain large amounts of E.coli, but even when compost rather than manure is used to make tea, the bucket method can be problematic. When bacteria grow too quickly they use up all the oxygen, creating anaerobic conditions that favour pathogens and cause good microbes to go dormant. If the compost is not mature and there are lots of available foods [for bacteria] in the compost it can cause anaerobic conditions, If the compost is mature, it is not as likely to result in something detrimental to your plant... rapid microbial growth won’t occur. Weed teas generally turn anaerobic in the first week, the best thing to do is leave them for weeks or even months. When the food runs out, the bacteria stop growing, oxygen moves back into the tea and as it becomes aerobic the good microbes emerge from dormancy, growing slowly on the wastes that the pathogens produced. Abundant life To quickly produce a compost tea packed with good microbial life (bacteria, fungi, protozoa and nematodes), a different method is needed. These days a number of farmers and backyard growers are “brewing” compost tea using a constant, substantial supply of oxygen. This allows good microorganisms to multiply rapidly without turning the brew anaerobic. The result is actively aerated compost tea (AACT). It contains an abundance of biological life: the essence of organic farming. Compost tea is becoming widely adopted by organic farmers and is used on a wide range of crops including vegetables, fruit, vines, cotton and cereals. It is used on trees, grass and gardens in public parks, on golf courses and bowling greens, and in the remediation of mining sites and saline and acidic soils. Good compost tea requires good compost. To make this, assemble a minimum one-cubic-metre heap of balanced and diverse materials (50 per cent brown, such as twigs, dried grass and shredded paper; 40 per cent green, such as fresh grass and soft stems; and 10 per cent high-nitrogen, such as manure or legumes) and keep it damp but not wet. Monitor with a temperature probe and turn the heap each time its temperature rises above 55°C and starts to drop, or if it reaches 65°. When you turn the heap and the temperature does not rise again, it is ready for tea brewing. If you suspend this compost in water and connect a pump, the turbulence knocks microbes off the compost and into the water. Give the microbes food, such as kelp, fish or molasses, and they breed prolifically. Of course, you could introduce these microbes to your garden simply by applying compost. But spreading compost over large areas can be back-breaking and expensive. Compost tea is easier – a 20-litre brew made from a handful of compost can inoculate an acre (almost half a hectare) with good microbes. Compost tea can also be applied as a foliar spray, with potential pest and disease-fighting benefits (see below). If you are not certain about the quality of your compost, author and soil expert Tim Marshall suggests enlivening it with recently collected liquid from a worm farm. “It is free and easily obtained and will definitely contain viable organisms,” he says. Soil biology Plants attract microbes to their root zones by giving off “exudates” of carbohydrates. Microbes feed on the exudates and each other, producing their own wastes and exudates, which becomes food for plants. Any nutrients that plants don’t use are locked up again by other microbes, which means that – unlike chemical fertilisers – they won’t be washed away. Food is constantly being cycled, and made available for plants to take up whenever they need it. As well as improving nutrient availability, a healthy soil food web will: improve soil structure and reduce compaction: bacterial exudates are sticky and make soil particles stick together, while fungi, earthworms and arthropods move through the soil, creating pathways; control disease: fungi and bacteria form protective nets around roots, outcompete pathogens or consume them; decompose chemical residues and toxic materials. In short, a balanced soil food web is what organic growers should aim for. Chemical fertilisers, pesticides, land clearing and tillage destroy this biology. Compost and compost teas are ways of putting it back. To buy or make a brewer? Instead of the bucket or bin brew method, better results come from brewers that pump oxygen into the mix. Commercially made compost tea brewers vary in size from 20 litres to thousands of litres. Home-made brewers are cheaper and can be easy to put together. If you follow the right plan they can also be effective. Home-made brewers can be as good as mass-produced brewers, the sticking point is aeration and good cleaning. How to use compost tea Compost teas are used in a couple of ways. Sprayed (or watered using a watering can) on soil, they add soluble nutrients and biological life to that soil. Applied as a foliar spray, they allow these goodies to occupy the leaf surface so that baddies such as powdery mildew have nowhere to get a foothold. Exactly how efficacious compost teas are in preventing disease has varied greatly in different trials. This may be because there are so many variables in tea-making. Compost tea used as a foliar spray will stick to leaves without adding a surfactant. Actively growing organisms make glue layers around their bodies in order to hold themselves on surfaces. To add microbial life that will help control soil pathogens and pests, Dr Ingham recommends an annual application of compost (a minimum of 3kg of compost added to a 1m seed row), or several applications of compost tea to soil each year. If using a backpack sprayer to apply compost tea, it’s important not to kill the good microbes in the process. Nozzle apertures should be no finer than 450 microns. Fan jet nozzles are best, and pressure should not exceed 65 PSI (about 4.5 bar). It is best to spray during cooler parts of the day, when evaporation and UV levels are low. Dusk is ideal. Microbes take 20 minutes to adhere to leaves, so apply foliar sprays at least 20 minutes before rain. Soil sprays can be applied during rain. COMPOST TEA RECIPES Fruit trees grow best in fungal-dominant soils, whereas vegetables prefer bacterially dominated soils. Brewing the right compost tea will help give the plants the conditions they like best. Commercial growers rely on soil tests to brew teas specific to their existing soil life and crops. For backyard growers these are a good place to start. Each recipe makes 20 litres of tea, which will cover one acre (0.4 hectare), but can be used on a smaller area: you can’t apply too much. General purpose tea (balanced fungal-bacterial brew) 20 litres water 80ml fish hydrolysate* 40ml liquid kelp 200g compost Add water to bin. If using town water, turn on pump and aerate water for 30 minutes to get rid of chlorine. Add food (fish and kelp) to water. Put compost in ‘tea’ bag. Brew for 24-30 hours. Vegie patch tea (bacterial brew) 20 litres water 30ml fish hydrolysate* 60ml liquid kelp 10ml blackstrap molasses 200g compost Three days before brewing, feed compost by mixing 10ml fish hydrolysate with 20ml of water and sprinkling over the compost. Keep compost in a cardboard box (the cardboard will absorb any excess moisture and allow compost to breathe) and keep in a warm spot (20-30°C). After 2-3 days the compost will have a ‘fuzz’ growing over it – this will be laden with fungal spores. After the compost has ‘fuzzed’ you are ready to brew. Brew as per general purpose tea, above. * Fish hydrolysate is made from whole fish, broken down by enzymes rather than heat. It contains fish oils that are good food for fungi. The more commonly found fish emulsion is less effective at growing fungi but will suffice as a substitute if need be. Note: In hot weather reduce food and brewing time. With overnight temperatures above 20°C, brewing will take only 18 hours and food should be halved. Teas should be used within four hours of brewing, before oxygen and microbe levels drop. A quick alternative to brewing compost tea is making compost extract. The same equipment is involved, but only compost is brewed, with no added food. It can be used after just 20-30 minutes of brewing. It will be lower in microbial life but still effective. Food for the microbes can be added to the tea just before it is sprayed. MAKE YOUR OWN BREW BUCKET Parts: 1 x 60-litre wheelie bin1 x 90-watt aquarium blower (minimum 200 litres a minute)1 x 450-micron tea bag2m 20mm electrical conduit2m 20mm corrugated electrical conduit1 x 20mm elbow2 x 20mm joiners2 x snap-clips1 x rubber chair leg tip20cm clothesline or other plastic cordDrill bits: 3mm and 25mmStep 1. Drill a 25mm diameter hole in the front left corner of the lid, in front of the handle. This is where the vertical aerator pipe will sit. Using strong scissors or pruners, cut the lip out to open up the hole. This enables the lid to be opened with the pipe in place. Step 2. Cut a piece of the 20mm electrical conduit so that it sits in the bottom left front corner of the bin, and sticks up above the lid about 150mm. Step 3. Put a 20mm elbow on the bottom of the vertical pipe. Measure from the front of the elbow diagonally across to the back right bottom corner of the bin. This is where the horizontal aerator pipe will sit. The aerator pipe will go into the elbow about 20mm, and in the other corner will have a rubber chair leg tip on the end. Cut long and be prepared to trim, to make a snug fit. Step 4. Drill a hole in the left rear corner of the bin, just below the lip, and the right front corner just below the lip. Thread clothesline plastic cord through the holes and tie knots to hold in place. Use snap-clips to hang tea bag from clothesline. The top of the bag should sit well above water level and be reasonably taut. Step 5. Connect about 1.5m of corrugated electrical conduit to the vertical aerator pipe using a conduit joiner. Use another joiner to connect the other end to the pump outlet. (The pump outlet may need tape wrapped around it to ensure a snug fit.) Step 6. Drill two rows of 3mm holes in the horizontal aerator pipe. The holes need to be 20-25mm apart, and located at the 5 and 7 o’clock positions (if the pipe is sitting on the bottom at the 6 o’clock position.)
- 1 reply
-
- 4
-
-
not much to say they look great love love the GH Cheese personaly i think its there best Indica by far. Enjoy
- 9 replies
-
- 1
-
-
- powderfeed
- cheese
- (and 1 more)
-
Using the viniger and baking soda is fine it will just be a little bit of trile and error till you get it right. Your plants in Veg stage prefur a lower PH 5.5 to 6 this allows greater uptake of nitrigen and in flower they like PH 6.1 to 6.5 this allows greater uptake of NPK's. The Chemicals VS Organic debate has been going for years. I have a very good friend who is a chemist with the CSIRO at the moment he is devolping nutrients for the wine industry. He has help me developed nutrients over the years and tested many products some of which have been shocking, companies claiming ingerdients that wern't there and some very toxic mixes. The more things you add the more possibilaty problems can occour end of the day its just a weed KISS= Keep It Simple Stupid. I belive and im sure many of the experianced growers will say just stick to the same product line if you choose nutrients as they are designed to work together and complement each other. I would use a combination of bat & chicken poo just starting with very low % and do some reasherch on Compost teas there is a great post on this site done by Fuzzy on the topic. Great place for anything you may need is e-bay
-
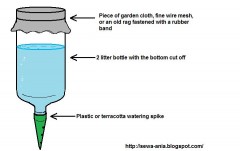
looking good soil looks sorted and love you are using the Bat shit that stuff is gold just be sure not to over do it. It can burn the plant if you use to much, just decide weather you want organic or use nutrients mixing both you can run into trouble sometimes and by what your potting mix says you have a good EC level to start with. Just be a-wear mixing organic and chemicals together unless you no the full make up off both and mineral % in each bottle which no product I no fully disclose you could be mixing up a bad mix. Unless you have a mineral separator and calculator about 15 grand in lab equipment you are just guessing. Mixing differant brands of nutriant can only courses problems only lab equipment can diagnose. You could make some shit tea, just put the bat shit into 1 of mums stockings and hang it in a bucket of water for a few days then water plants with the shit juice. I have also been known to put some road kill into my pots like dead birds or rabbits. The NPK's you dont need to worry about untill the plants go into flower. Also been thinking about your watering and you could use water spikes under $1 here and will save you making the trip everyday, they are just a plastic spike that screws onto a plastic drink bottle very simple very affective. If possible rain water is best i think, just keep your PH as close to 6 as possible and you shouldnt have a problem. good luck and keep us posted
-
Hey skipper my guess is they are going back into veg. If you are in QLD like me you may have noticed we have just had the longest day of the year only a week or so ago. Normaly when outdoor growing down here we starts around October/November and pull around March/April. I'm thinking it could be a combonation of the longer days and low NPK's in your soil as Cannabissapean mentioned. The best fail proof method of growing outdoor all year round that I've been using for over 30yrs is a combonation of in-door and outdoor. I veg my plants just under CFL's growing 19hrs on 5hrs off. Then when you are happy with the height put them straight outdoors and they will go into flower straight away. I grow my plants to 600mm to 1mtr then out they go I just use this method for my personals as it allows me to grow all year round
-
Good starter pack of Marijuana growing e-books 33 books in total which cover all the basics. This is a torrent download http://kickass.to/marijuana-growing-e-books-collection-33-books-rar-t5800336.html